THROWING THE BASEBALL
 |
Call or Text 425-591-7612
www.baseball-excellence.com |
 |
 |
 |
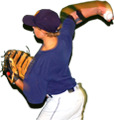
| Arm at High Cocked Position | External Shoulder Rotation | Ball Release out in front |
Throwing a baseball correctly is a basic requirement of the game, yet the most under-coached skill. Players may get away with poor arm action* in their early years, but as the field gets larger and the speed of the game increases, good throwing mechanics and arm strength become absolutes and are taken for granted. At the ages of 13, 14 and 15 too many players leave the game of baseball because they were never taught to throw properly. Teaching a young player to throw and catch correctly may be the single most important thing a youth coach can do for a player. The ThrowMAX flexible arm brace is the most effective throwing training aid. Just about every player will benefit from using a ThrowMAX.
LOWER BODY
Throwing starts with the feet. The right foot should be perpendicular to the target.
Teaching Tip: Point the right anklebone at the target. (RH player)
The front foot should land slightly closed (5º) and on a straight line with the target.
Teaching Tip: Point the toes of the front foot just to the right of the target as the front foot lands.
UPPER BODY
The lead arm should be elbow high and aligned with the throwing arm.
Teaching Tip: Point the lead arm elbow at the target- use it as a ‘gun sight’ and helps the front shoulder stay closed.
The throwing arm should be elbow high and aligned with the head and lead arm.
Teaching Tip: The arm is in a ‘cocked’ (L) position with the ball pointing backwards and fingers on top of the ball.
The ball is thrown out in front of the head with the wrist outside the angle of the elbow. Throw when the trunk squares and the chest is over the front leg.
Teaching Tip: Throw the ball when “nose is over toes.”
Throw the ball with a smooth, fluid follow through.
Teaching Tip: Show the back of the rear shoulder to the target on follow through.
*ARM ACTION
Arm action is defined as the circular movement of the throwing arm as it leaves the glove, moves down, back and up and delivers the baseball. An infielder’s arm action is different from a pitcher/outfielder in that the pitcher takes his arm down, back and up and the infielder/catcher takes the ball out of his glove straight back to the cocked position (the infielder/catcher needs a quicker release). The thumb must be under the baseball and the fingers on top. The wrist must be supple but firm so it does not flop off to either side. It stays behind the baseball all the way to release.
THROWER'S CHECKLIST
|
GRIP |
|
|
FEET |
|
|
ARM ALIGNMENT |
|
|
ELBOW |
|
|
LEAD ARM |
|
|
EXTENSION |
|
|
SMOOTH FOLLOW THROUGH |
|
Tips:
- As the hand leaves the glove, keep the thumb underneath the baseball and the fingers on top.
- The hand, arm and elbow form a slightly expanded ‘L’ with the baseball facing back. The ThrowMAX helps with this positioning of the arm, also known as the high cocked position.
- Do not open up or throw the baseball until the front foot has landed.
- Keep the front shoulder pointing at the target until the front foot lands.
- Release the ball at full extension. The grip should always be 4-seam
- Look to see if the lead shoulder is closed when the player’s front foot lands. It is common for a player to ‘open’ his front side too early, resulting in added stress on the arm and inaccurate throws.
- Teaching a player to throw correctly is one of the most important things a coach can do.
- Pay close attention to arm action. Common faults are hooking the ball, low elbow, turning the wrist, improper ‘cocked position’, flailing, long arming, wrist inside the angle created by the elbow and ‘pie throwing’. The ThrowMAX helps eliminate these faults.